General line name
 Every electrical connection line
which is open at one (or both) ends (such as a connection to a BUS or
a continuous line to other pages) requires a line name when this
line is continued to other points in the set of drawings, otherwise the
list generator will not be able to assign the lines.
Every electrical connection line
which is open at one (or both) ends (such as a connection to a BUS or
a continuous line to other pages) requires a line name when this
line is continued to other points in the set of drawings, otherwise the
list generator will not be able to assign the lines.
What are the different ways of entering the line name?
Changing the line name: The dialog is only active when you have
switched off the option ‘Activate online destination wiring’
under Parameters / General / Compatibility tab and have not
activated the option ‘Enter line name via general input field’
under Tab / Connect and load. Several connections can be
managed for one and the same line name. A connection database
is created at the same time.
Alternatively, enter the line name
via the input field, in which case, only the line names
are compared on the drawing and used for cross-referencing. By
doing this, it is not possible to manage several connections for a single
line name. No connection database is created.
Enter / change / edit line name
When you activate the menu option Line
name, at first, a context menu appears in which you can decide which
functions you want to execute in relation to the line name.
Here, select Enter.
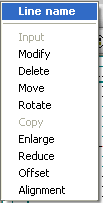
The dialog Enter line name appears.
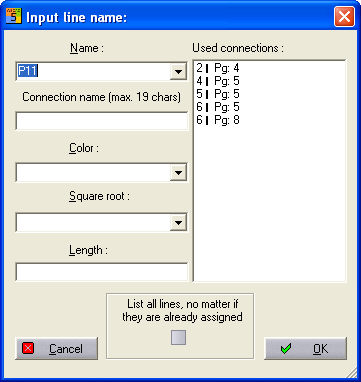
Enter the line name, click on OK
and position it on the line. By clicking with the left mouse button
(or: pressing the <Return> key), the line name is
fixed and the Enter line name dialog immediately opens again.
However, if you select the context menu
option Change, then you must first select an existing line name
from the circuit diagram. Only then does the above Enter line name
dialog appear.
Placing the name at the end of
the line is important: The beginning of the name must lie on the
line (distance e.g. due to movement with grid switched on) between the
end of the line and the next coordinate point (kink or other line end)
of the line, otherwise another applicable name will be assigned for this
line group. You can also rotate the line name, change its size or even
make it invisible (by placing an object in front).
Input line name dialog
In the Input line name dialog:
define the line name, connection, colour, cross section and the length
of the wire to be laid.
Line names
Enter a new line name and confirm
with the Enter key (not the OK button) or open the list field and
select an existing name.
Connection
If you enter a new connection designation
or select one of the existing connections for this line name
then this will appear in the large list field on the right. With the set
option Show double connections, you will see all connections
with this line name.
Assign line - connection
If you wish to assign the line
just drawn to an existing open connection, simply select the relevant
entry on the right in the list field with a double click. Any existing
information such as connection name and colour etc. will
be transferred immediately. Otherwise, give the line a connection name
in addition. Each open connection can only be assigned once (beginning
and end count as one open connection in each case). This is the
only way to make it possible to identify this open line end precisely
later on.
Placing the line name
After clicking on the OK button,
the line name is placed automatically. Abort with <Esc> or
the right mouse button.
Hint
The values for colour
and cross section are also saved in test files (Colour.TXT or Crosssection.TXT
in the database directory) in addition and are therefore available for
future entries.
Special function for
electronics
For lines with names that end in
numbers (e.g. data or address lines) and which lie on top of one another
within the fixed distance, only the first line name needs be entered.
If you abort the entry via the dialog, the other names will be written
and positioned automatically with the command Draw free hand /
Repeat. The numbers at the end of the name are increased
by one each time. The direction of the repeat is up to you. For example,
you can choose for the names to be counted in ascending order.
Line cross reference
when lines have the same potential
Different line names can be assigned to
open line ends. However, in this case, use the Connection field
in the dialog to assign open line ends. You can only use a connection
twice. This makes it possible for the cross references to be unambiguous.
Only line ends to which the same line name and the same connection have
been assigned refer to one another.
Automatic pre-assignment
of text parameters
When entering General text and
line name, the size and direction as well as the angle of rotation
of the last entry or change is used as a pre-assignment.
Hint
The length of the test
is restricted to 48 characters.