With the 'Schematic – Cableshield'command you
start drawing a cable shield. Set the start point and then the end point
of the line, then cancel the command with the right mouse button or <ESC>.
The component 'Cable shield' is created automatically. The pin will be
at the start point position, at the end point you will see a half circle.
Note
You can draw a cable shield only horizontally
or vertically
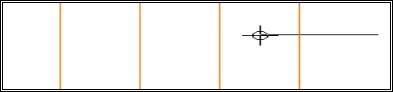
The following screen shot shows 4 vertical connection lines,
on the right is the starting point of the cable shield.
1
2
3
4
start
Draw the line for the cable shield across the connection
lines, set the end point and cancel the line drawing function.
Compact module or Professional
module without cable manager
Now you must enter the reference name of the cable
that the shield belongs to.
Professional module with cable manager
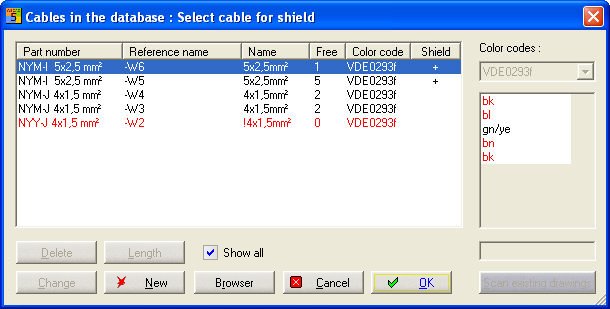
The dialog of the cable
manager appears:
All cables of the current project are listed in the
dialog, cables which may have a shield are marked with a '+' in the
column 'Shield'.
Select an existing
cable and click on OK. The dialog closes and the cable shield will be completed
in the schematics. The reference name is taken from the selected cable,
function text and pin name are marked as invisible. With the option 'Showall' of the cable manager you
can list all cables in the current project, independent of whether the
cable has the correct entry in the material database ('1' in the field
'height').
If you select a cable
without a cable shield, a dialog will ask you if the material database
should be adapted. If you answer with YES, the database field 'height' of that
particular cable will be set to '1'.
 With the 'Schematic – Cable shield' command you
start drawing a cable shield. Set the start point and then the end point
of the line, then cancel the command with the right mouse button or <ESC>.
The component 'Cable shield' is created automatically. The pin will be
at the start point position, at the end point you will see a half circle.
With the 'Schematic – Cable shield' command you
start drawing a cable shield. Set the start point and then the end point
of the line, then cancel the command with the right mouse button or <ESC>.
The component 'Cable shield' is created automatically. The pin will be
at the start point position, at the end point you will see a half circle.